Downloads & install
The Downloads & install screen (page heading Install Sectigo Edge locally) is where you get every component that runs in your own environment, together with ready-to-copy commands that verify the release before anything is installed.
ConsoleDownloads & installWhat it's for
- Download the Mesh Node for Linux, Windows or Kubernetes.
- Download the operator CLI and the optional private signer.
- Verify that a release is authentic before installing it.
- Create the one-time enrollment package a new node needs.
What you see
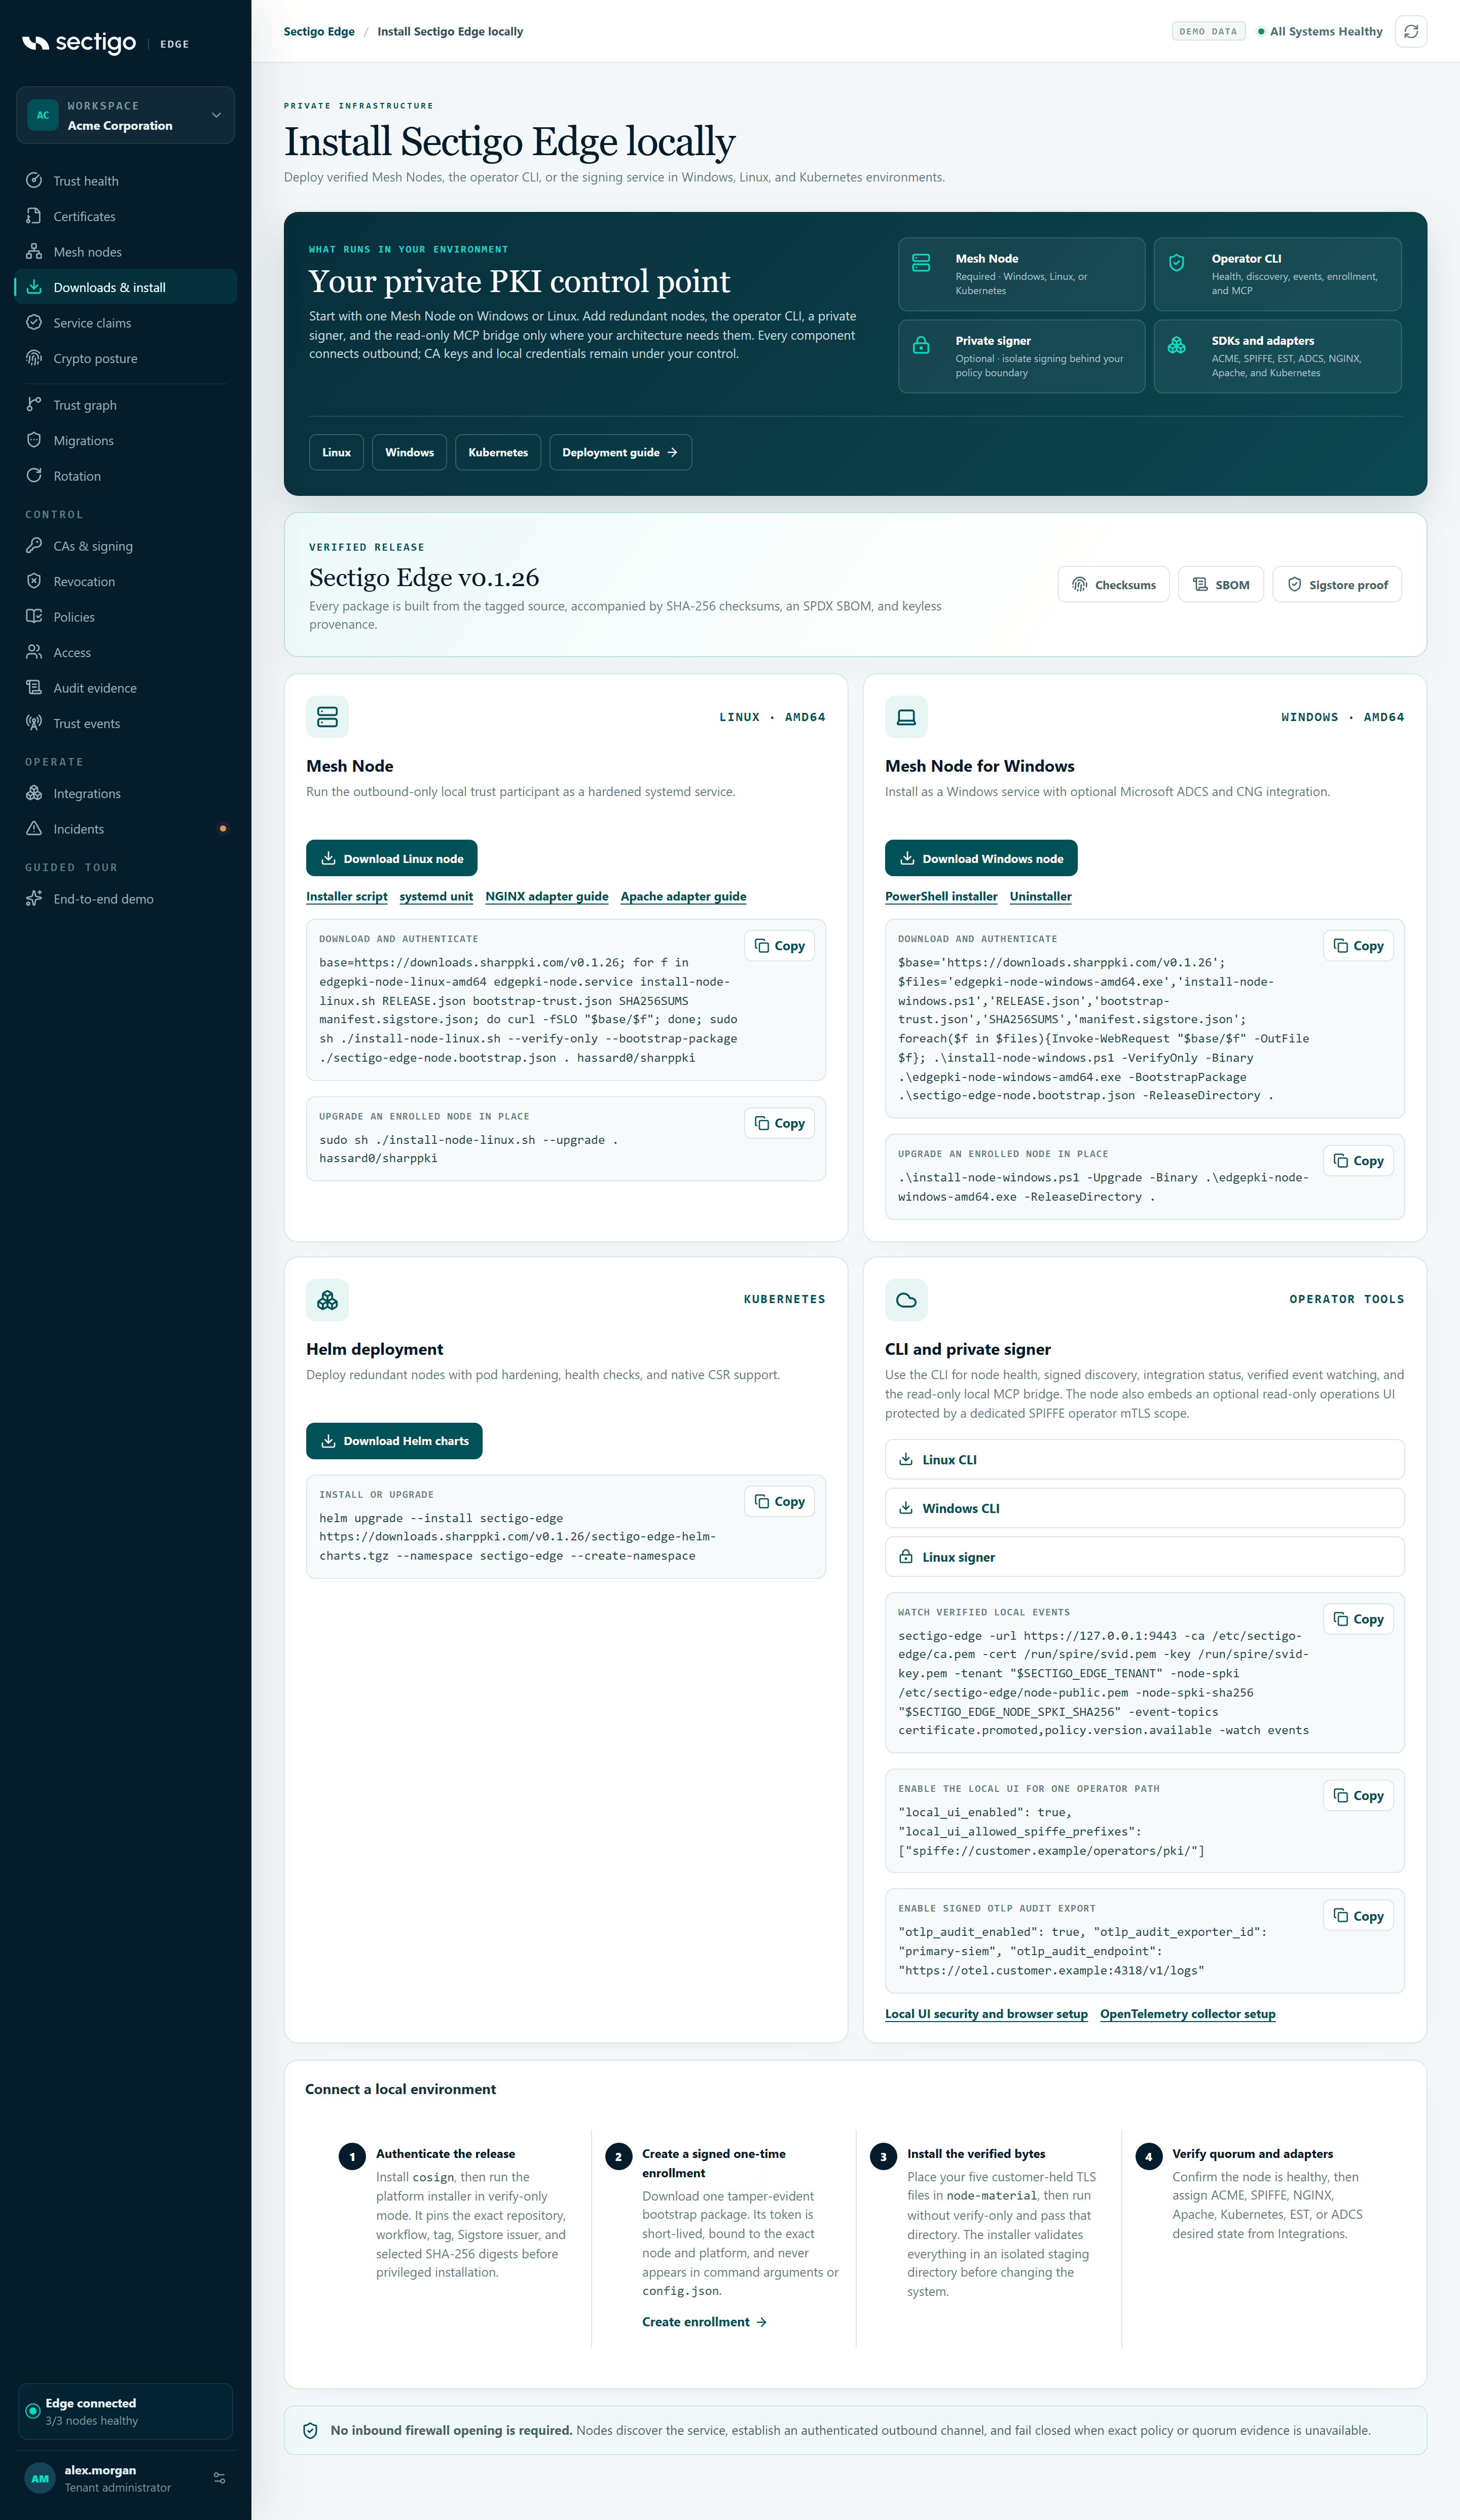
The screen has five parts.
1. What runs in your environment
Your private PKI control point lists the components and whether you need them:
| Component | Description in the console |
|---|---|
| Mesh Node | Required · Windows, Linux, or Kubernetes |
| Operator CLI | Health, discovery, events, enrollment, and MCP |
| Private signer | Optional · isolate signing behind your policy boundary |
| SDKs and adapters | ACME, SPIFFE, EST, ADCS, NGINX, Apache, and Kubernetes |
Start with one Mesh Node. Add redundant nodes, the CLI, a private signer and the read-only MCP bridge only where your architecture needs them. Every component connects outbound; CA keys and local credentials stay under your control.
Shortcut links jump to the Linux, Windows and Kubernetes cards.
2. Verified release banner
Shows the current release, for example Sectigo Edge v0.1.26. Every package is built from the tagged source and comes with three verification files:
| Button | File | Use it to |
|---|---|---|
| Checksums | SHA256SUMS | Check the SHA-256 digest of each download. |
| SBOM | sbom.spdx.json | Review the SPDX software bill of materials. |
| Sigstore proof | manifest.sigstore.json | Verify keyless build provenance with cosign. |
3. Download cards
| Card | Downloads | Commands shown |
|---|---|---|
| Mesh Node (LINUX · AMD64) | Download Linux node, Installer script, systemd unit, plus links to the NGINX and Apache adapter guides | Download and authenticate, Upgrade an enrolled node in place |
| Mesh Node for Windows (WINDOWS · AMD64) | Download Windows node, PowerShell installer, Uninstaller | Download and authenticate, Upgrade an enrolled node in place |
| Helm deployment (KUBERNETES) | Download Helm charts | Install or upgrade |
| CLI and private signer (OPERATOR TOOLS) | Linux CLI, Windows CLI, Linux signer | Watch verified local events, Enable the local UI for one operator path, Enable signed OTLP audit export |
Every command has a Copy button. Always copy commands from the console so you get the exact current release version.
4. Connect a local environment
A four-step summary of the install process, described in Install and connect a node below.
5. Footnote
No inbound firewall opening is required. Nodes discover the service, establish an authenticated outbound channel, and fail closed when exact policy or quorum evidence is unavailable.
Install and connect a node
- Authenticate the release. Install
cosign, then copy and run the Download and authenticate command for your platform. It downloads the release files and runs the installer in verify-only mode, which pins the exact repository, workflow, tag, Sigstore issuer and SHA-256 digests before any privileged installation. - Create a signed one-time enrollment. Select Create enrollment and download the bootstrap package. Its token is short-lived, bound to the exact node and platform, and never appears in command arguments or
config.json. See Mesh nodes. - Install the verified bytes. Put your five customer-held TLS files in
node-material, then run the installer without verify-only and pass that directory. The installer validates everything in an isolated staging directory before changing the system. - Verify quorum and adapters. Confirm the node is healthy on Mesh nodes, then assign ACME, SPIFFE, NGINX, Apache, Kubernetes, EST or ADCS desired state from Integrations.
Example: verify a Linux release
The Download and authenticate command for Linux downloads the node binary, systemd unit, installer, RELEASE.json, bootstrap-trust.json, SHA256SUMS and manifest.sigstore.json, then runs the installer with --verify-only. The command below is shown as it appeared for v0.1.26, split across lines for readability. Copy the live version from the console.
base=https://downloads.sharppki.com/v0.1.26
for f in edgepki-node-linux-amd64 edgepki-node.service install-node-linux.sh RELEASE.json bootstrap-trust.json SHA256SUMS manifest.sigstore.json; do curl -fSLO "$base/$f"; done
sudo sh ./install-node-linux.sh --verify-only --bootstrap-package ./sectigo-edge-node.bootstrap.json . hassard0/sharppki
Example: verify a Windows release
$base='https://downloads.sharppki.com/v0.1.26'
$files='edgepki-node-windows-amd64.exe','install-node-windows.ps1','RELEASE.json','bootstrap-trust.json','SHA256SUMS','manifest.sigstore.json'
foreach($f in $files){Invoke-WebRequest "$base/$f" -OutFile $f}
.\install-node-windows.ps1 -VerifyOnly -Binary .\edgepki-node-windows-amd64.exe -BootstrapPackage .\sectigo-edge-node.bootstrap.json -ReleaseDirectory .
Rename the bootstrap file in the command to match the package you downloaded, for example sectigo-edge-production-edge-01.bootstrap.json.
Upgrade an enrolled node
Use the Upgrade an enrolled node in place command from the Linux or Windows card after downloading the new release files:
- Linux
- Windows
- Kubernetes
sudo sh ./install-node-linux.sh --upgrade . hassard0/sharppki
.\install-node-windows.ps1 -Upgrade -Binary .\edgepki-node-windows-amd64.exe -ReleaseDirectory .
helm upgrade --install sectigo-edge https://downloads.sharppki.com/v0.1.26/sectigo-edge-helm-charts.tgz --namespace sectigo-edge --create-namespace
See Upgrades for the complete procedure.
Operator tool snippets
The CLI and private signer card includes three snippets:
| Snippet | What it is |
|---|---|
| Watch verified local events | A sectigo-edge … -watch events command that follows signed trust events from a local node, pinned to that node's public key. See Trust events. |
| Enable the local UI for one operator path | Two config.json settings, local_ui_enabled and local_ui_allowed_spiffe_prefixes, that turn on the node's read-only operations UI for one SPIFFE operator path. See Local operations UI. |
| Enable signed OTLP audit export | Three config.json settings, otlp_audit_enabled, otlp_audit_exporter_id and otlp_audit_endpoint, that send signed audit records to your OpenTelemetry collector. |
Permissions
Every role can view this screen and download files. Creating an enrollment package requires PKI Operator or Tenant Admin and MFA within the last ten minutes.
Troubleshooting
| Symptom | Cause and fix |
|---|---|
| Verify-only mode fails | Do not install. Re-download the files, make sure all of them come from the same release, and check that cosign is installed. |
| The bootstrap package is rejected | It expired, was already used, or targets a different runtime. Create a new enrollment. |
| A link opens a general documentation page | Some links on this screen point to the docs home rather than a specific guide. Use Install on Linux, Install on Windows or Kubernetes (Helm). |